Why Cheap Helmet Brims Fail Under Australian Sun: Don't Risk It
Australian sun is brutal. Your helmet brim needs to be too. Learn why cheap options buckle under pressure and what to look for to protect yourself.
Why Cheap Helmet Brims Fail Under Australian Sun: Don't Risk It
Australia. It's a beautiful country. Stunning beaches, vast landscapes, and... unrelenting sun. We all know how harsh our UV rays can be, especially during those long summer days and at peak UV times. If you're working outdoors, on a bike, or in any situation requiring head protection, you're likely wearing a helmet. But are you truly protected from the sun's glare and damaging UV radiation with your current setup?
Many people opt for cheap, generic helmet brims. They seem like a good idea at first glance – a quick fix, a low-cost addition to block out some sun. However, under the intense Australian conditions, these budget options often buckle, crack, and fail, leaving you exposed and vulnerable. It's not worth the risk to your eyes and skin.
The Brutal Reality of Australian Sunlight
Let's be blunt: Australian UV levels are consistently among the highest in the world. The UV Index, a measure of the intensity of ultraviolet radiation, frequently reaches 'very high' and 'extreme' levels, especially in summer and in inland or northern regions. This isn't a mild inconvenience; it's a serious health hazard.
What does this mean for your helmet brim?
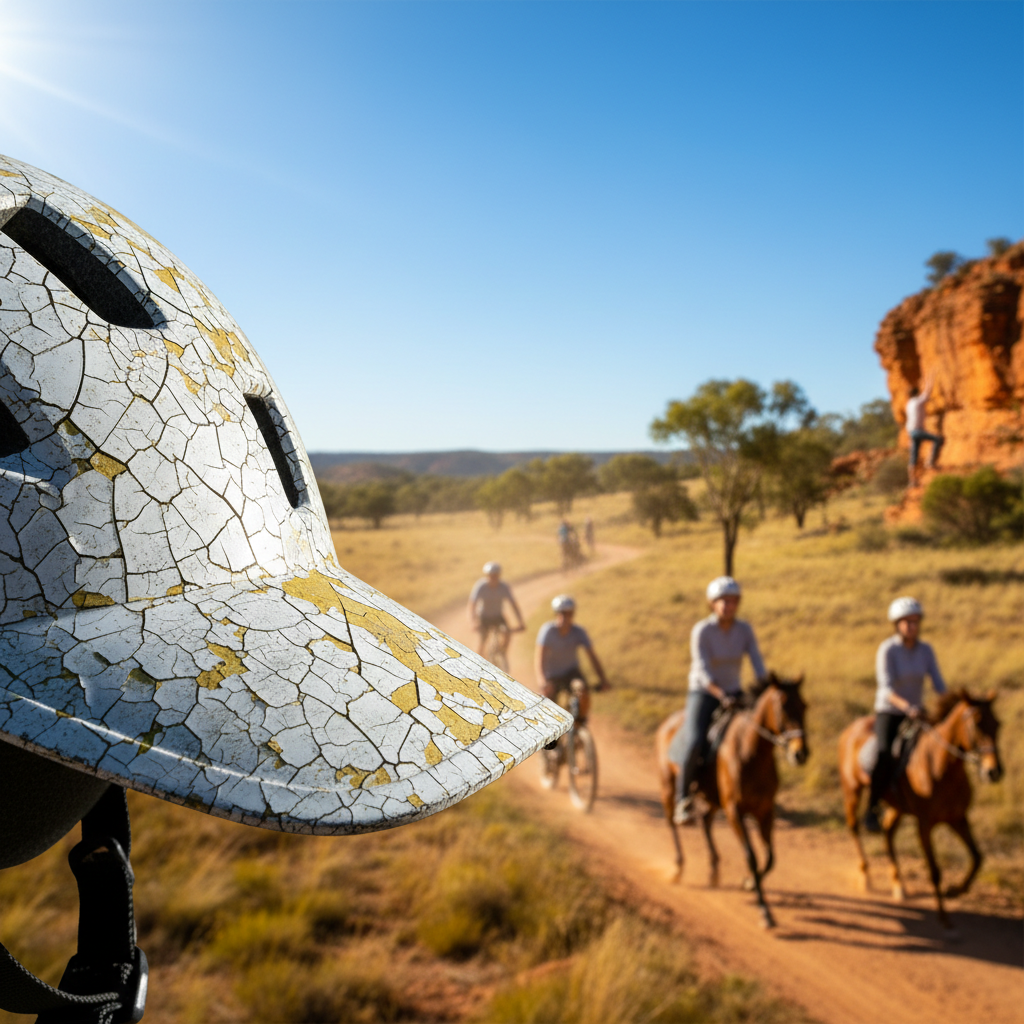
Degradation of Materials: Cheap plastics, commonly used in low-cost brims, are not designed to withstand prolonged, intense UV exposure. They become brittle, lose their structural integrity, and can crack or even shatter. This degradation happens faster and more severely under the Australian sun.
Heat Warping: During hot Australian days, temperatures can soar. This heat, combined with direct sunlight, can cause cheaper plastics to warp and deform. A warped brim won't sit correctly on your helmet, compromising its position and effectiveness. It can also become a hazard itself if it's hanging loose.
Reduced Visibility: A failing brim might sag unevenly, obscure your vision, or become transparent in places, defeating its purpose of providing shade. Blinding glare can lead to accidents, whether you're operating machinery, riding a bicycle, or working on-site.
Short Lifespan: You might buy a cheap brim, but how long will it actually last? Under Australian conditions, you'll likely find yourself replacing it repeatedly, costing you more in the long run than investing in a quality, durable product from the start. This is a classic case of being penny-wise and pound-foolish.
Common Failures of Cheap Helmet Brims
We’ve heard the stories, and we’ve seen the damage. Cheap brims, especially those made from single-molded, low-grade plastics or flimsy fabrics, are prone to specific, predictable failures under the Australian sun:
Cracking: This is the most common issue. The plastic becomes brittle from UV exposure and heat, leading to cracks, often radiating from attachment points or stress areas. A cracked brim is a compromised brim.
Fading and Discolouration: While not a structural failure, significant fading indicates UV absorption and degradation. The material is breaking down, even if it hasn't cracked yet.
Becoming Brittle: The material loses its flexibility, making it prone to snapping rather than bending. This can happen suddenly, leaving you unprotected.
Warps and Bends Out of Shape: Cheap plastic will often lose its rigidity, especially in extreme heat, making it unable to hold its intended shape and therefore reducing its effectiveness.
Attachment Point Failures: The mechanisms designed to attach the brim to the helmet often fail first. Clips break, straps degrade, or the material around attachment points tears.
Don't Get Caught Out: A Quick Comparison
Here's a simplified look at what separates a cheap brim from one built to last:
| Feature | Cheap Brim | Quality Brim |
|---|---|---|
| Material | Low-grade, untreated plastic | UV-stabilised, impact-resistant |
| Construction | Thin-walled, single mold | Robust, engineered design |
| UV Resistance | Poor - degrades quickly | High - designed for prolonged sun |
| Heat Tolerance | Low - warps easily | High - maintains shape in heat |
| Attachment | Basic clips, flimsy straps | Secure, durable fastening system |
| Longevity | Short, prone to failure | Long-lasting, reliable |
| Australian Sun | Major risk of failure | Built to endure |
Investing in Protection: What to Look For
If you're going to attach a brim to your helmet, do it right. Your eyes and skin deserve protection that can actually handle the conditions. When choosing a helmet brim, especially for Australian use, consider these crucial elements:
1. Material Quality: Look for brims made from high-quality, UV-stabilised plastics. These are specifically engineered to resist degradation from sunlight. Often, industrial-grade or engineering polymers will be used.
2. Robust Design: A good brim won't just be a flat piece of plastic. It will have reinforcing ribs, a curved shape for better shade, and a design that complements your helmet's structure.
3. Secure and Durable Attachment: The system used to attach the brim is critical. It needs to be strong, reliable, and able to withstand vibrations, bumps, and extreme temperature changes. Avoid flimsy clips or straps that might degrade in the sun.
4. Australian Conditions Testing (Implicit): While not always advertised, products designed for harsh environments will inherently use superior materials and construction. Think about where the product is intended to be used.
5. Brand Reputation: Reputable brands that specialise in safety equipment or outdoor gear are more likely to offer products that are built to last. They understand the demands of exposure.
Installing a Brighter Future: How to Attach Properly
Even the best brim can fail if it's not installed correctly. We recommend using a system that is proven and reliable. Our Products page showcases brims designed for durability. Once you've got a quality brim, follow these simple steps for installation:
Step-by-Step Installation Guide
This is a general guide. Always refer to the specific instructions provided with your brim.
1. Clean Your Helmet: Ensure the area where the brim will attach is clean, dry, and free of debris. This helps create a good surface for attachment.
2. Position the Brim: Place the brim against your helmet in the desired position. Most brims are designed to cover the front of the helmet, extending over your eyes and forehead.
3. Secure the Attachment Points: This is the most crucial step. Follow the specific mechanism for your brim:
Clips: If your brim uses clips, carefully slide or snap them into place around the helmet's edge or designated slots. Ensure each clip is fully engaged. You should feel a secure ‘click’ or resistance.
Straps/Velcro: If straps are involved, loop them through any available points on the helmet and fasten them securely. For Velcro, ensure a strong bond.
Bolts/Screws: If your brim requires bolts or screws, align the holes and tighten them firmly, but do not overtighten, which could crack the helmet or brim.
4. Test for Stability: Gently tug on the brim in different directions. It should feel solid, with no significant movement or looseness. Try to wiggle it – there should be minimal play.
5. Check Visibility: Put the helmet on and look around. Ensure the brim provides adequate shade without obstructing your essential field of vision. Adjust if possible for optimal placement.
For more detailed, visual instructions, check out our How to Install guide.
Common Questions About Helmet Brims
We get asked a lot of questions about helmet brims. Here are a few common ones, with practical answers:
Will a cheap brim really crack that fast?
Yes, unfortunately. Under consistent, strong sunlight and heat, low-grade plastics are highly susceptible to UV degradation. We've seen them become brittle within months.
Can I use any brim on any helmet?
Not always. Different helmets have different designs. It’s best to use a brim specifically designed for your helmet type or a universal brim known for its adaptable and secure fit. Our Products listing often specifies helmet compatibility.
How much sun protection does a brim offer?
A good brim significantly reduces direct UV exposure to your eyes and forehead. It helps prevent glare, reducing eye strain and the risk of sunburn on your face.
Are there specific brims for different jobs (e.g., construction vs. cycling)?
Yes. Construction helmets often require more robust, impact-resistant brims that can withstand knocks, while cycling brims might prioritise aerodynamics and lighter weight. However, UV protection is paramount for all.
- How often should I replace my helmet brim?
For further assistance, our comprehensive FAQ section is a great resource.
The Bottom Line: Don't Compromise on Sun Safety
In Australia, the sun isn't a gentle presence; it's a powerful force. Your helmet brim is a critical piece of your personal protective equipment, designed to shield you from its harshest effects. Opting for cheap, flimsy alternatives is a gamble you shouldn't take. The long days, high UV index, and intense heat here will expose their weaknesses rapidly, rendering them ineffective and potentially creating even bigger risks.
Invest in quality. Invest in the materials, the design, and the durability that can stand up to our unique environment. Protect your eyes, protect your skin, and ensure your safety gear is working as hard as you are. Explore our range of robust helmet brims designed to handle the Australian sun. Your future self will thank you.
For more articles on safety and gear, visit our Blog.