Sunbrims vs DIY Helmet Brims: Why Your Helmet Needs More Than Just Tape
Stop messing around with makeshift helmet brims. Learn why a dedicated sunbrim is essential for Australian conditions and how it stacks up against DIY solutions.
Sunbrims vs DIY Helmet Brims: Why Your Helmet Needs More Than Just Tape
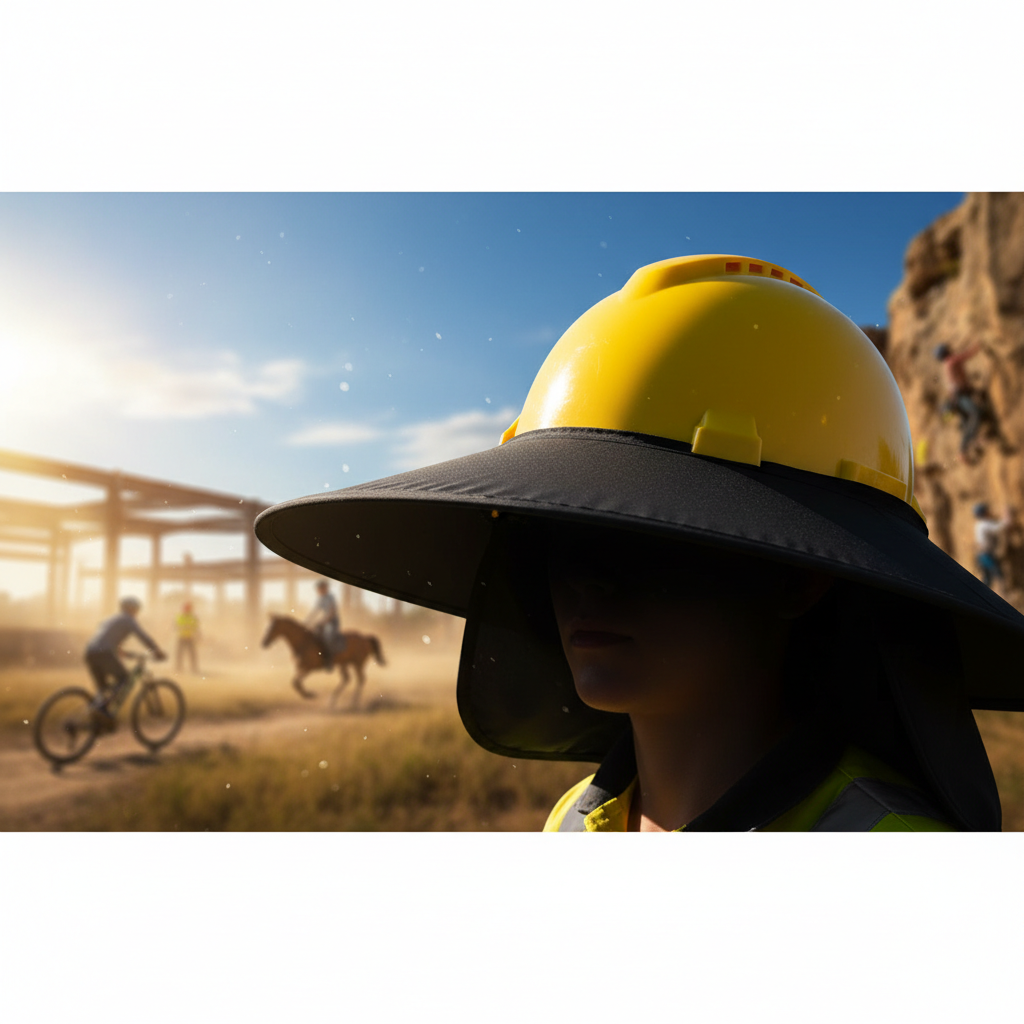
Australia. We love it. Sunny days, outdoor adventures, hard yakka under the big blue sky. But let's be honest, our sun is fierce. The UV Index can rocket into the extreme range faster than you can blink, and those long summer days mean prolonged exposure to its harsh rays. If you're wearing a helmet for work, sport, or any outdoor activity, you're already doing one smart thing. But are you really protected? Many Aussies think a bit of tape and some cardboard can hack it for a DIY helmet brim. We're here to tell you why that’s a bad idea and why a purpose-built sunbrim, like da brim, is the only way to go.
The Problem: Australia's Unforgiving Sun
The Australian sun isn't messing around. We're talking about the highest UV radiation levels on Earth. Even on cloudy days, UV rays can penetrate: and sunburn, premature ageing, and skin cancer are serious risks. Your face, neck, and ears are particularly vulnerable, especially when you're focused on the job or the trail ahead.
Long-term exposure leads to:
Skin Cancer: The most significant risk. Australia has one of the highest rates of skin cancer in the world.
Premature Ageing: Sunspots, wrinkles, and leathery skin can appear much sooner than you'd think.
Eye Damage: Cataracts and other eye conditions can be exacerbated by UV exposure.
Heat Stress: Prolonged sun exposure contributes to dehydration and heat exhaustion, especially during demanding activities.
Your helmet is designed for impact protection, not necessarily for comprehensive sun coverage. That's where a quality sunbrim comes in.
The DIY Dilemma: A False Sense of Security?
We've all seen them or even made one: the tape-and-cardboard contraption strapped to a helmet. It might block a sliver of sun directly overhead for a little while, but let's break down why it's a fundamentally flawed solution.
Cost vs. Value
DIY: "Free" materials (scrap cardboard, duct tape).
Dedicated Sunbrim: An investment, but one that pays dividends in protection and durability.
Effectiveness
DIY:
Limited Coverage: Usually just a small, rigid flap that offers minimal shade. The edges often let the sun creep in.
Angle Dependence: Only provides shade when the sun is directly overhead. As the sun moves, so does the angle of your 'protection'.
Inconsistent Fit: Prone to slipping, flapping in the wind, and generally being unreliable.
Doesn't Cover Neck/Ears: Most DIY efforts focus solely on the face, leaving crucial areas exposed.
Dedicated Sunbrim (like da brim):
Maximum Coverage: Designed with specific contours to block sun from a wide range of angles, protecting your face, ears, and often the back of your neck.
Flexible and Secure Fit: Attaches firmly to most helmets without damaging them, staying put through movement, wind, and vibration.
Durable Materials: Made from UV-resistant, weather-proof materials that won't disintegrate in the heat or rain.
Reduces Glare: Helps to minimise glare, improving visibility and reducing eye strain.
Durability and Longevity
DIY:
Degradation: Cardboard warps, tears, and becomes soggy in rain. Duct tape loses its adhesion in heat and can leave nasty residue.
Short Lifespan: You'll likely be rebuilding your DIY brim multiple times a season.
Dedicated Sunbrim:
Built to Last: Made from materials like UV-stabilised polymers or treated fabrics designed to withstand harsh Australian conditions for years.
Resists Elements: Won't fade, crack, or degrade under prolonged sun or rain exposure.
Safety Concerns
DIY:
Obscured Vision: A poorly designed or flapping DIY brim can obstruct your vision, creating a safety hazard.
Loose Objects: Taped-on items can detach and become projectiles or trip hazards.
Heat Trapping: Some DIY materials might trap heat rather than reflecting it, making your helmet hotter.
Dedicated Sunbrim:
Engineered for Safety: Designed to be aerodynamic, non-obstructive, and securely attached.
Ventilation: Many are designed to work with existing helmet ventilation systems.
Professionalism and Image
DIY: Frankly, it looks unprofessional and can detract from your image, whether on a worksite or a recreational trail.
Dedicated Sunbrim: Projects a professional, safety-conscious image and demonstrates you take your well-being seriously. You can see our range of products to find one that suits your helmet and your style.
A Quick Comparison Table
| Feature | DIY Helmet Brim | Dedicated Sunbrim (da brim) |
|---|---|---|
| UV Protection | Minimal, angle-dependent | Maximum, multi-angle coverage |
| Durability | Poor; degrades quickly in sun/rain | Excellent; built for harsh conditions |
| Fit & Security | Unreliable; prone to slipping/flapping | Secure and stable attachment |
| Coverage | Limited to face | Face, ears, and often neck |
| Vision | Can obstruct; potential hazard | Designed not to obstruct |
| Professionalism | Low | High |
| Cost | "Free" materials, but time & frequent replacement | One-time investment for long-term protection |
| Heat | Can trap heat | Designed for breathability or minimal heat trap |
Step-by-Step: The Right Way to Add Sun Protection
Forget the scissors and sticky tape. Here's how you get serious sun protection for your helmet:
Step 1: Choose Your Sunbrim
Select a sunbrim designed for your specific type of helmet (e.g., hard hat, bike helmet). Consider the amount of coverage you need. Some offer a basic brim, while others extend to protect your neck. Look for UV-resistant materials. da brim offers a variety of options for different helmets and needs.
Step 2: Ensure Compatibility
Check that the sunbrim is compatible with your helmet model. Most quality sunbrims have universal attachment systems, but it's always worth double-checking the specs. Visit our Products page to see compatible models.
Step 3: Installation
Follow the manufacturer's instructions for attachment. This usually involves a simple clip-on or Velcro system. Our How to Install guide provides clear visuals and steps for a secure fit in minutes. A correctly installed brim is crucial for its effectiveness and safety.
Step 4: Ongoing Care
Keep your sunbrim clean by washing it with mild soap and water. Avoid harsh chemicals or abrasive cleaners that could damage the material. Store it properly when not in use to prolong its lifespan. For common questions about care and maintenance, check our FAQ.
Why da brim is the Smarter Choice
We developed da brim out of necessity. We understand Australian conditions: the relentless sun, the need for practical solutions, and the frustration with gear that doesn't perform. Our sunbrims are engineered with:
Superior UV Protection: Designed to maximise shade coverage, reducing your exposure significantly.
Durable, Lightweight Materials: Built to withstand the elements without weighing you down or breaking the bank.
Secure, Hassle-Free Attachment: Attaches firmly to most standard helmets with ease. No drilling, no complex tools required.
Aerodynamic Design: Minimises wind resistance and won't catch on branches or equipment.
Breathability: Designed to integrate with your helmet's ventilation, keeping you cooler than a DIY solution might.
Don't compromise on your health. A DIY fix might seem like a quick win, but it's a gamble with your skin and potentially your safety. Investing in a proper sunbrim is a small price to pay for comprehensive protection against Australia's intense UV rays.
Ready to Upgrade Your Protection?
Stop wasting time and risking your skin with flimsy, ineffective DIY solutions. It's time to get serious about sun safety. Explore our range of products and find the perfect da brim for your helmet. For installation tips, FAQs, and more on staying safe, navigate to our How to Install, FAQ, and Blog sections. Protect yourself the right way. Your skin will thank you.